
Whether you want to mitigate legal list, are trying to assess how accessible your website really is for users with disabilities, or are feeling overwhelmed after reading the official Web Content Accessibility Guidelines (WCAG 2.1) - this guide is for you!
While we won’t be covering all WCAG requirements, we’ll cover the vast majority of them, and, most importantly, the ones that are most essential. We aim to do that in a quick and easy format that anybody can follow, regardless of technical expertise.
By the end of this guide, you’ll have a solid understanding of your website’s accessibility level and what issues you should address to ensure WCAG 2.1 and ADA compliance.
Here’s how we’ll be testing your website:
- We’ll start by testing how compatible your website is for use only with a keyboard, from navigation to operation.
- We’ll use a free accessibility testing tool called accessScan to evaluate various types of common accessibility issues.
- We’ll download and test your website with a screen-reader called NVDA, which is an assistive technology software used by blind users.
This guide adheres to the WCAG 2.1 (Web Content Accessibility Guidelines) at the AA level, which is the required standard for complying with the ADA, Section 508, AODA, ACA, HB-1110, Unruh Act, EAA, IS 5568, and most other global regulations.
Throughout all these stages, we will also explain how to test your site with accessiBe's accessWidget installed, so let’s dive in!
1. Testing how compatible your website is with keyboard navigation and operation
Users on your site with differing motor skills will make keyboard accessibility an integral part of their navigation. Users with motor impairments like Parkinson's, Multiple Sclerosis (MS), and people with disabilities that prevent them from using a mouse are forced to use a combination of keyboard commands to navigate and operate websites.
Let’s kick off the testing! From this point forward, all of your site’s major functions should be operable and navigable via the keyboard. Press the Tab key to move forward, and Shift+Tab to move backward. Make sure that while Tabbing, you can always see the "tab focus" or "focus ring", as you move around.
IMPORTANT NOTE: If you’re using macOS with Safari, Apple turns off keyboard navigation by default, and requires users to turn that on through the Preferences. Make sure to turn it on before continuing with the test.

Basic tests for ensuring keyboard navigation compatibility:
- Does the movement of the Tab key follow a logical order? If the site’s language is English, the order should be from left to right and from top to bottom.
- Make sure every link and button can receive keyboard focus by tabbing to them, and press Enter to ensure you can activate them.
- Ensure the focus ring is always noticeable and easily locatable. If you have lost sight of it, well, that’s a problem.
Advanced tests for ensuring keyboard navigation compatibility:
1) Is there a way to skip to the main content?
Press the Tab key for the first time after the page loads, and make sure a “skip to content” link is revealed at the top. This way, you ensure your site provides users a way to skip the header or menu and go straight to the main content.
2) Ensure your menus are accessible:
- Use the Tab key to reach the main menu of your website.
- Ensure that you can navigate to all menu options without skipping any of them
- If your menus have submenus, they should expand when the focus hits their top menu item, and you should be able to navigate within them using the Tab key
- Throughout the test, please ensure that the focus is visible and noticeable to the eye
3) Ensure your forms are accessible:
- Use the Tab key to reach a form, and ensure you can navigate to all Its fields.
- Ensure you can select and deselect checkboxes using the spacebar.
- Radio options should be switchable using the arrow keys (up-down-left-right)
- If validations exist, submit the form and ensure your keyboard focus is being automatically taken to the first field with a validation error.
4) Ensure your popups are accessible:
- If you have popups on your site, trigger them open (either by clicking a button or any other method).
- When a popup appears, the keyboard focus should lift off the main page and land back down within the popup itself. The next Tab you hit must navigate within that popup, and you should not be able to escape the popup regardless of how many times you press the Tab key.
- Ensure the popup can be closed by hitting the Esc key.
- Ensure the "focus ring" goes back to the previously focused element after closing the popup.
2. Evaluating your website accessibility level with an automated testing tool
There are several web accessibility testing tools, such as WAVE, Lighthouse, and accessScan, available for free website evaluation. accessScan is a free web accessibility testing tool developed by our internal engineering team and will be our main focus in this section.
accessScan was initially developed as accessiBe's evaluation tool for accessWidget, our AI web accessibility solution, making it the most accurate web accessibility tool currently available. In order to provide our partners with the most up-to-date accessibility reports, accessScan flags various accessibility issues in order to effectively evaluate the accessibility of a site.
While this guide is essentially about manual accessibility testing, designed for people who want a deeper understanding of the process, accessScan makes the testing process simpler and more comprehensive to non-technical users.
The next section will help you understand what accessScan flags and their importance. The report provided by accessScan not only gives you a clear understanding of issues and errors that exist on your site but also an understanding of the current compliance level of your site.
How to read the report
After a quick scan of your website, accessScan will provide you with a simple answer to whether your website is accessible and compliant or not. The report is divided into 11 sections:
The sections are:
- Clickables
- Titles
- Orientation
- Menus
- Graphics
- Forms
- Document
- Readability
- Carousels
- Tables
- General
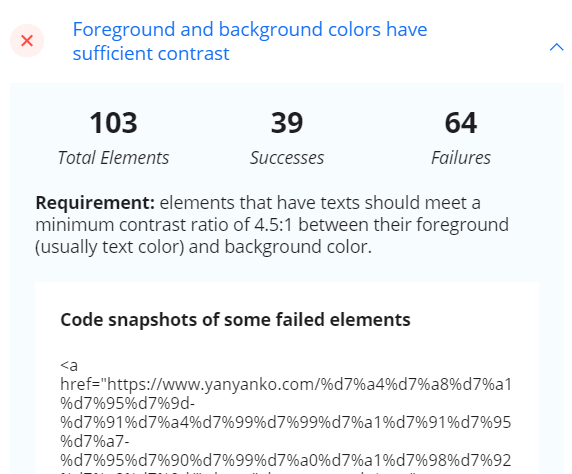
Each section consists of different elements that accessScan looks for. If the element exists, you’ll see a green V. If the element is missing, and is a must according to the WCAG 2.1 AA, you’ll see a red X. And, if there are elements that are required by the WCAG 2.1 AA, but they don’t exist on the website, you will see a grey, neutral, circle.

For each element, there is a dropdown that will help you understand the following:
- How many times the element appeared on your website
- How many of these elements are defined as needed (success)
- How many of these elements aren't defined as needed (failure)
- Requirements according to the WCAG 2.1 AA
- Code snapshots of failed elements
- Code snapshots of successful elements
3. Testing your WCAG and ADA compliance level using a screen-reader
There are different types of visual impairments, such as blindness, partial blindness, or age-related vision loss. Blind users use screen readers to operate and surf websites.
Screen-readers not only read content out loud but also add additional functionality that helps blind users navigate and operate websites using special keyboard combinations.
For this test, we will use the NVDA screen reader, which is a reliable and free open-source software created by NVAccess. By running the NVDA, we’ll be checking how compatible your HTML structure is for blind users.
Note that NVDA is for the Windows operating system only. If you are using a MAC, you already have the VoiceOver screen-reader installed by default.
Using a screen reader with accessiBe's accessWidget
If you run a screen reader on a site where accessWidget is installed, you’ll be prompted to use Alt+1 to turn the relevant adjustments on. Once in the "Accessible mode", you can start browsing using the screen reader. Important note: This prompts immediately on page load, so make sure to refresh the page if It’s already open on your machine.
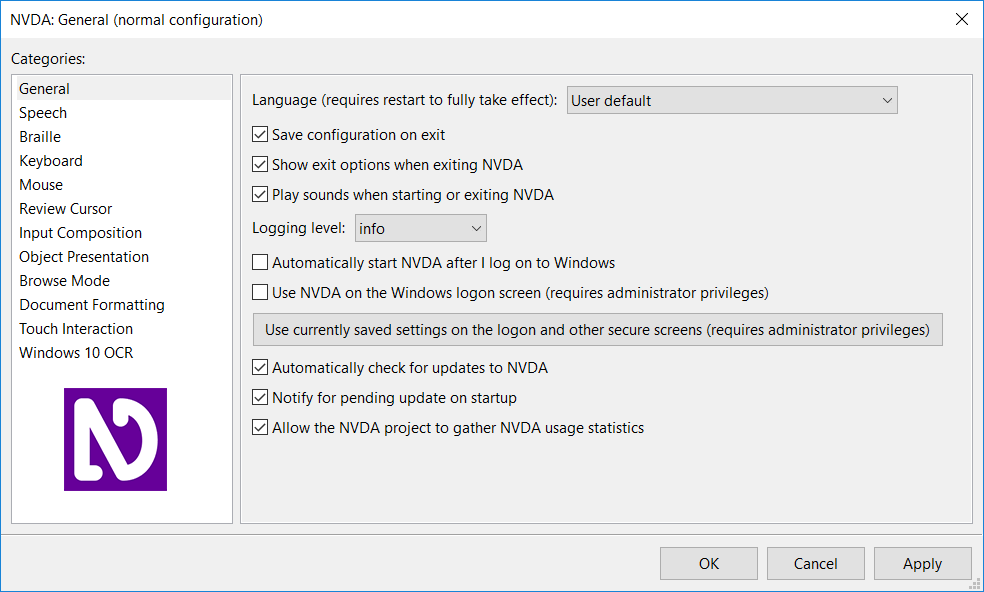
Let’s kick off the testing! To get started, download NVDA at https://nvaccess.org/download
After the quick installation, you can run it by clicking on the NVDA icon that appeared on your desktop or by pressing CTRL+ALT+N. For this test to be effective, remember to use only the keyboard commands, as screen reader users do not use a mouse.
Navigating using a screen-reader is done by hitting the ↑/↓ (up-down arrows) keys. The arrow-down will take you to the next element, while the arrow up to the previous. This method of navigation provides much more context than the Tab key, which is mostly used by blind users in forms.
Please note: unlike standard keyboard navigation, screen-readers navigate a much broader set of elements, so you will not always see the focus ring, and that is completely Ok as long as the screen-reader reads out the content in a logical order as displayed on-page. Remember, for a user who is blind, the focus ring is less important.
Here's what you should look out for:
- Proper navigation: Make sure while navigating through the site all focused elements like titles, headings, buttons, forms, and links are (a) reachable, and (b) being read out by the screen reader.
- Proper readouts: Elements should be read out with their proper role. Here are the readouts you should expect:
- Buttons (elements that are clickable and trigger some change in the page itself without loading a new one) should be read out “(button text), button”.
- Links should be read out “(link text), link”.
- Menus should read out “navigation region”.
- Menu items with dropdowns should read out “submenu collapsed/expanded”
- Lists should read out “list of X items”.
- Tabs should read out “Tab Panel”.
- And the list goes on, those are the most common elements and their proper readouts.
- Proper popup handling: ensure that when a popup appears, all standard keyboard navigation functionality is applied (as explained above in the keyboard navigation section), but this time, also ensure the screen reader reads out “modal dialog” as soon as the popup appears.
- Proper title hierarchy: ensure that all headings follow a hierarchy, from bigger to smaller. Press the H key to move between the headings. NVDA identifies heading levels so h1, h2, and h3 should be read consequently as “Heading level 1”, “Heading level 2”, “Heading level 3”, and so on up till 6 (you don’t have to include all levels).
- Proper image descriptions: ensure that every image has a textual description. Press G to move to the next image and listen to how NVDA describes it. The readout should be descriptive enough for blind users to understand the objects and the text that is embedded within them (that is if there is text at all). For example, an image featuring a shoe model with the text “50% OFF on all shoes”, should be described as “Woman modeling a shoe, 50% OFF on all shoes”, or a similar description.
- Proper form field descriptions and validations:
- Press the F key to find the next form, and start navigating within it using the Tab key. As explained above, blind users with screen-readers use the Tab key in forms instead of the arrow keys.
- Ensure all form fields read out the following information
- Their purpose (phone, email, name, etc)
- If they are required (or nothing if aren’t)
- If they are invalid (or nothing if valid)
- For example, an empty, required email field should read out “Email required, invalid entry”. After adding a correct email, it should read out the same, but without the “invalid” part.
- Use Space to select and deselect checkboxes, and ↑/↓ to switch between radio options. Make sure to focus those first using the Tab key.
- If the information submitted was incorrect, ensure that the screen reader informed you about the error with the proper guidance to understand and fix it. Also, make sure that the focus moved to the first field you should modify.
Final Takeaways
Phew, we are finally done and you made it through!
The purpose of this guide is to provide simple instructions to check your website’s accessibility level for free, using three different methods: manual testing using keyboard navigation, an automating testing tool, and using the NVDA screen-reader.
We aimed to write the guide in the simplest way we could, so with a little patience, anybody, regardless of their technical know-how, can assess their accessibility compliance level in a comprehensive way. We hope that we've made it!
As mentioned at the start, the guide does not cover all accessibility requirements, only the most common and essential ones. The requirements we've tested easily cover the majority of the items, so if your test came out close to our explanations, you are probably covered. For a full, 100% test, we suggest following the WCAG 2.1 guidelines clause-by-clause: https://www.w3.org/TR/WCAG21
Thanks for reading!